Introduction to Feature Flagging
Imagine your company is running a festive campaign, and you've built a small feature: a bright new banner on the homepage to announce "Diwali Sale - 50% Off!". You deploy it along with other updates, and everything looks good until you realize that a tiny bug in your banner code that is causing the homepage to crash for thousands of visitors. Users have started complaining, and the only way to fix it is to rolling back the entire deployment including all the other stable features, just to disable that one small banner. This could be frustrating because due to a single feature, you have to redeploy the entire code base, which causes major change that increases the risk.
You cannot afford that kind of risk in this fast-paced world where we must meet high customer expectations. You need more control over what you release, when, and to whom. You need something to experiment safely, rollout gradually, fix bugs instantly, and test features in real-world conditions without constantly redeploying code. This is where Feature Flagging comes in, which provides power to the team to control the features dynamically, i.e, within a single click, you can either enable or disable the problematic feature.
What is Feature Flag
A feature flag is a conditional statement in your code that decides, usually through an if-else condition which decides whether a specific piece of code must be enabled or disabled.
It is something like below pseudo code:
**If flag:**
 **# code for X feature**
**else:**
 **# code**
sh
The Flag variable in the code is like a remote control. You can enable the feature for all users or some percentage of users without modifying the code or redeploying the app.
Approaches for Feature Flagging
Feature flagging is not just about turning things on and off features but it's about how and when you do it. Different teams use different approaches. Below are some of them.
- Kill Switch Approach: This approach works as an emergency button. If a feature fails in production or causes any issue, it can easily be disabled just turning the flag off. There is no redeploy, no rollback, no downtime. This feature is usually used in critical conditions to ensure that one single feature doesn't take down the entire system.
- Segments-based approach: This approach enables features for specific groups of users based on rules or attributes such as Region, Plan type, or User role, etc. For example, enable a beta feature only for internal employees or enable a specific feature for premium users. This approach helps teams target the right audience without exposing features to everyone.
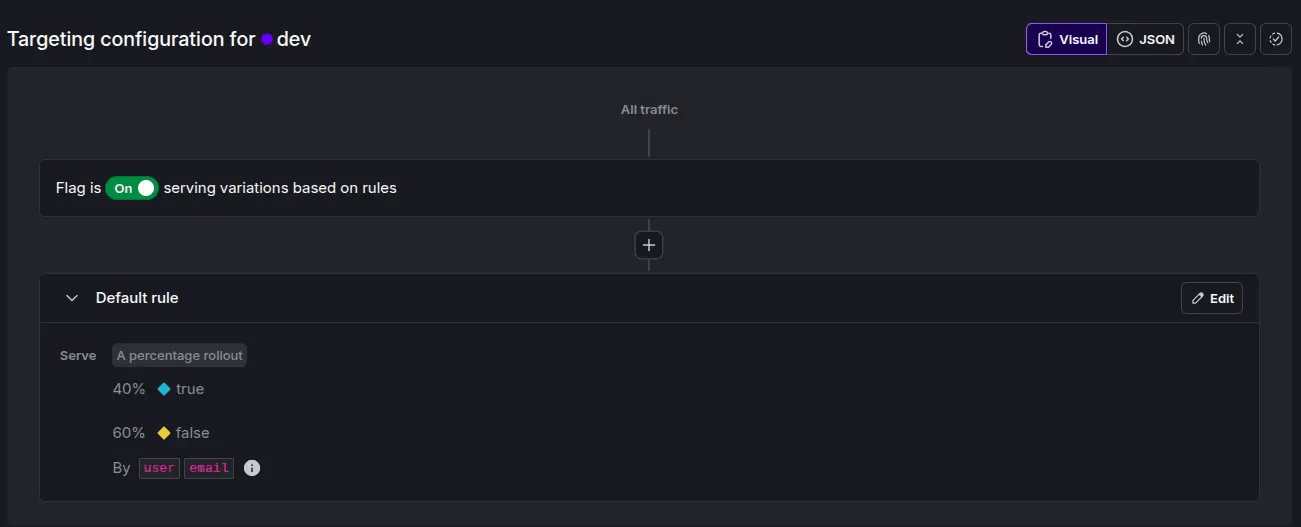
- Manual Percentage Approach: This feature is to release a certain percentage of users, say 40% and observe how they respond. If things look good, you can manually increase the rollout percentage step by step.
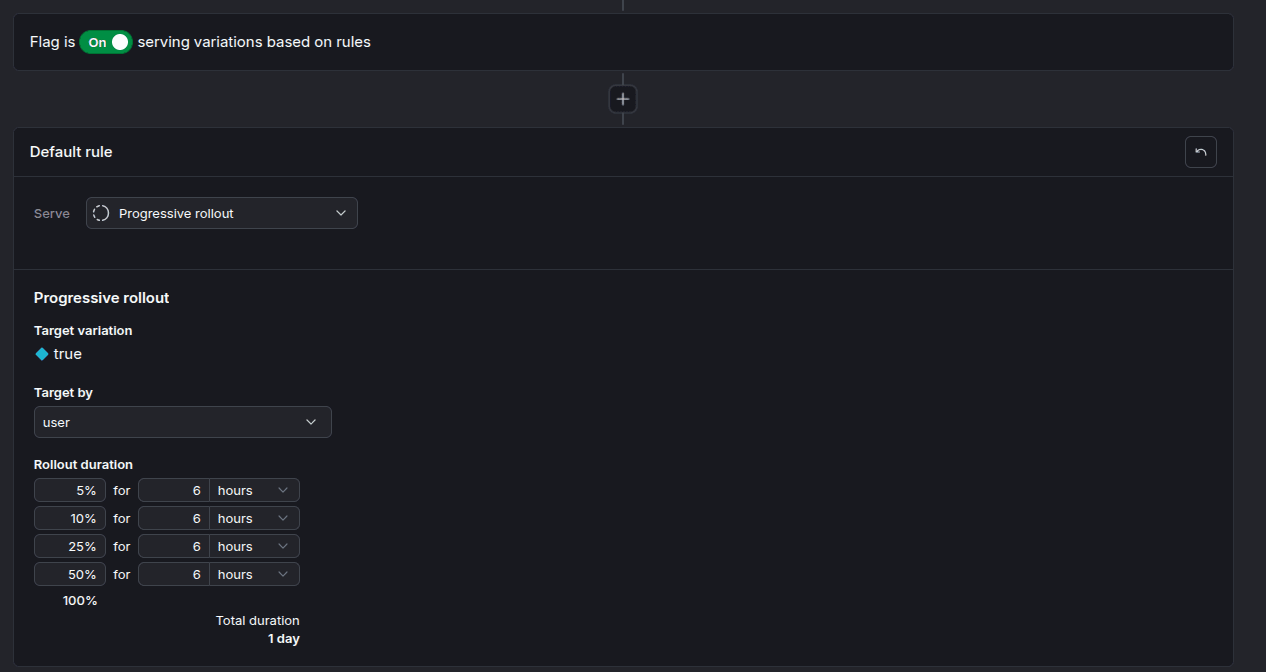
- Progressive Rollout based approach: This approach is quite similar to the manual percent approach, but instead of manually increasing it percentage the percentage in duration, let's say 5% every 6 hours.
- A/B testing: This approach allows teams to test different versions (variants) of the same feature. Each variant is exposed to a subset of users to see which version performs best. Later, a well-performed version can be rolled out to everyone.
- Guarded rollout: This is a controlled feature release strategy where a new feature is gradually rolled out to users while continuously monitoring key metrics like error rate or latency, etc. If any metric crosses a defined threshold, the rollout automatically pauses or the feature flag is turned off to prevent impact on all users.
To take a real world example, let's look at how Google, one of the world's most reliable and fast-moving organizations, uses feature flagging for safe and controlled launches. They treat product launches as engineering challenges, not just code deployments.
At Google, every new feature is wrapped behind a feature flag. This allows teams to ship code early but keep it "dark" until they're confident it's ready. Features are then enabled gradually 5%, 25%, 50%, and finally 100% of users while closely monitoring system behavior and performance. If something goes wrong, teams can instantly rollback by simply turning the flag on-off redeploys, no downtime.
Google's reliability engineers, known as Launch Coordination Engineers (LCEs), play a key role in this process. They review every launch to ensure it's safe, scalable, and well-monitored. Before any rollout, they verify capacity planning, dependency health, and rollback strategies through a detailed launch checklist.
Instead of flipping a switch and making a feature live for everyone, Google prefers gradual rollouts starting with a small set of servers or users, a canary release. These canaries help detect performance issues or unexpected behavior early. Every stage of the rollout is tracked through custom dashboards and alerts, and automated safeguards can pause or reverse a rollout if metrics start to degrade.
Behind all this, Google relies on shared internal tools that manage feature flags, monitor metrics, and coordinate rollouts across teams. This common infrastructure keeps the entire launch process consistent, safe, and efficient, allowing Google to release new features quickly without compromising reliability. (Source: Google SRE Book)
How Feature Flagging is different from Service Mesh
Feature flags and Service Meshes both help in releasing features safely, but they work at different levels. Feature flags control what happens inside your application; it lets you turn features on or off for users without touching the code. Service meshes, on the other hand, work at the infrastructure level and control how traffic flows between services, and they decide which version of a service gets the request. In short, feature flags manage feature exposure, while service meshes manage traffic routing.
Benefits of Feature Flag
Feature flagging isn’t just a simple if-else condition but a way for safer feature delivery to users. Let's talk about the benefits of feature flagging.
- Faster & Safer Releases: With feature flags, teams can ship code anytime, even if a feature isn't fully ready. You just keep it hidden behind a flag until it's safe to show.
- Instant Kill Switch for Faulty Features: If something goes wrong in production, you don't need to panic or roll back everything. Just turn off the feature flag, and the problem disappears instantly.
- Targeted Rollouts for Specific Users: Not every feature needs to go to everyone at once. You can enable it only for certain users, say, internal testers, premium members, or users in one country. This helps collect feedback, fix issues early, and make sure the feature works perfectly before a full release.
- Gradual & Progressive Rollouts: Instead of switching a new feature on for everyone, you can roll it out step by step, maybe 5% today, 20% tomorrow, and so on. This way, if something breaks, only a small group is affected, and you can pause or roll back safely before it impacts all users.
How Do We Implement Feature Flagging
Implementing feature flagging is not just about adding an if-else condition in your code, it's about introducing a controlled release mechanism into your deployment process. The main goal of feature flagging is to enable or disable a feature without touching the code, without redeploying the code.
Feature flagging implementation involves 3 steps:
- Flag Definition: Creating a flag that controls a specific feature.
- Flag Evaluation: Checking in your application code whether the flag is ON or OFF for a given user or context.
- Flag Management Using a centralized dashboard or service to manage who sees the feature, rollout percentage, or variants.
Top feature flagging tools
Feature flags can be managed manually via config files or environment variables or with specialized platforms that offer dashboards, SDKs, and rollout rules. Below are popular tools that can help you manage feature flags:
OpenFeature
OpenFeature is an open source cloud native project, which helps you in feature flags without depending on any specific vendor i.e it is vendor-neutral. It seats between the application code and the vendor. You can write code using Openfeature API and can swap provider without changing your application code.
LaunchDarkly
A commercial, SaaS-first platform that gives you a polished dashboard, advanced SDKs. You can create feature flags, target users, schedule rollouts, and monitor how features are performing across environments.
Unleash
An open-source, self-hosted tool that’s widely adopted. It offers user targeting, percentage rollouts, A/B experiment support, and works well in Kubernetes / Docker environments.Its UI is developer-friendly, and you can extend it with your own modules or add-ons.
Flagsmith
An open-source feature flag tool that you can host yourself or use as a cloud service. It lets you turn features on or off for different users or groups and manage multiple environments like development, staging, and production. You can roll out features gradually, target specific users, and see all changes in audit logs. Flagsmith has an easy-to-use dashboard and APIs, with SDKs for many programming languages, making it simple to add feature flags to any application.
GrowthBook
A tool that leans heavily into experimentation and A/B testing. You can define multiple variants (A/B/n) and compare metrics, with integrations to analytics tools. Good fit when your goal is to optimize user behavior rather than just toggle features.
Flipt
An open-source, lightweight feature flag system built for developers who prefer simplicity and control. It's API-first and self-hosted, meaning you can integrate it easily into CI/CD pipelines or microservices. Flipt supports percentage rollouts, environments, and audit logs all without a heavy UI.
For this demo, we'll use LaunchDarkly since it’s widely used and simple to get started with.
Demo: Set Up LaunchDarkly
You can create a free account at launchdarkly.com
Once you log in, you'll land on the LaunchDarkly dashboard. Create a new project and an environment. Each environment will have a unique SDK key this is how your application uses to communicate securely with LaunchDarkly. You can obtain the SDK Key from Project settings and copy it, which you will use later in the code.
Now create a flag name and provide it information
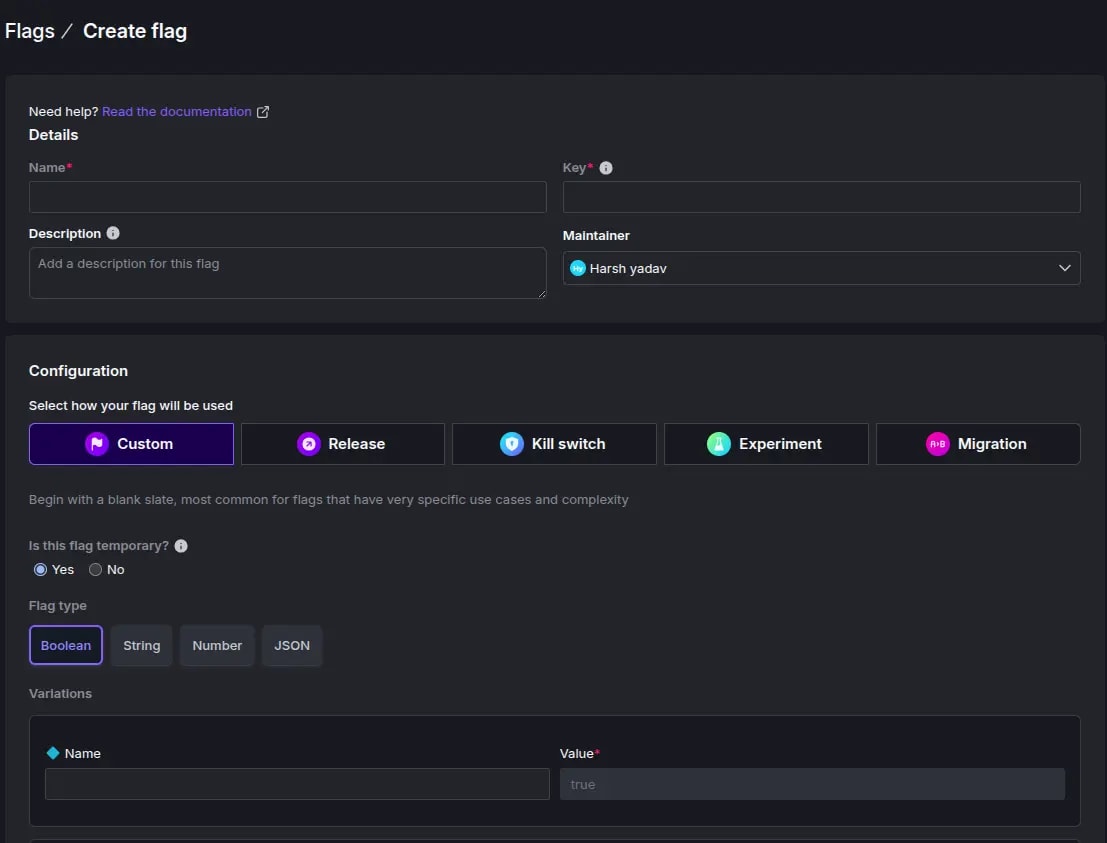
Before jumping to the code, let's first understand how the key works and how LaunchDarkly communicates with the code.
SDK Key is like an access token that lets your application talk securely with LaunchDarkly's servers. Each environment in LaunchDarkly (like Production, Test, Staging) has its own SDK key. When your app starts, it uses this key to initialize the SDK and connect to the correct environment.
LaunchDarkly Client acts as the brain of feature flagging inside your app. When you start the app:
- The client connects to LaunchDarkly using your SDK key.
- It downloads all the feature flag configurations (flag names, values, rules, etc.).
- It keeps a streaming connection open so it can receive updates instantly when a flag changes.
So if you turn a flag on/off from the LaunchDarkly dashboard, your client knows it within seconds.
Context defines who the Feature Is for. Every time your app checks a feature flag, LaunchDarkly needs to know who the user (or context) is.
Example of setting up a context.
pythonFlag Evaluation is decision point once you have a context, you use the client to check a flag's value Example
show_banner = client.variation("show-images", context, False)
python
For demonstration, we will be using a Flask application. Install the required requirements, i.e, LaunchDarkly SDK and Flask
pip install launchdarkly-server-sdk flask
bash
Export the key to your os environment
export LD_SDK_KEY="launchdarkly-sdk-key"
bash
In the code
from flask import Flask, render_template, request
import ldclient
from ldclient.config import Config
from ldclient import Context
import os, time, random

app = Flask(__name__)

sdk_key = os.environ.get("LD_SDK_KEY")
if not sdk_key:
    raise Exception("LD_SDK_KEY not found in environment variables")

python
Once you have the key, you need to initialize the SDK so your app can talk to LaunchDarkly's servers.
ldclient.set_config(Config(sdk_key))
client = ldclient.get()

print("Waiting for LaunchDarkly SDK to initialize...")
for _ in range(10):
    if client.is_initialized():
        print("SDK successfully initialized")
        break
    time.sleep(1)
else:
    print("SDK failed to initialize within timeout")
    exit(1)
python
Setup context
def get_context(user_key="default-user", name="Guest", email=None, plan=None):
    """Builds a LaunchDarkly context with optional attributes."""
    builder = Context.builder(user_key).name(name)
    if email:
        builder.set("email", email)
    if plan:
        builder.set("plan", plan)
    return builder.build()
python
Now, let's implement approaches we have discussed above one by one.
- Kill Switch Implementation
In LaunchDarkly UI create flag named kill switch with value show-images and set the boolean value true as ON and false as OFF
def kill_switch_feature():
    """Simple on/off flag controlling visibility of an image."""
    context = get_context("demo-context", "Harsh")
    flag_value = client.variation("show-images", context, False)
    return render_template("index.html", show_image=flag_value)
python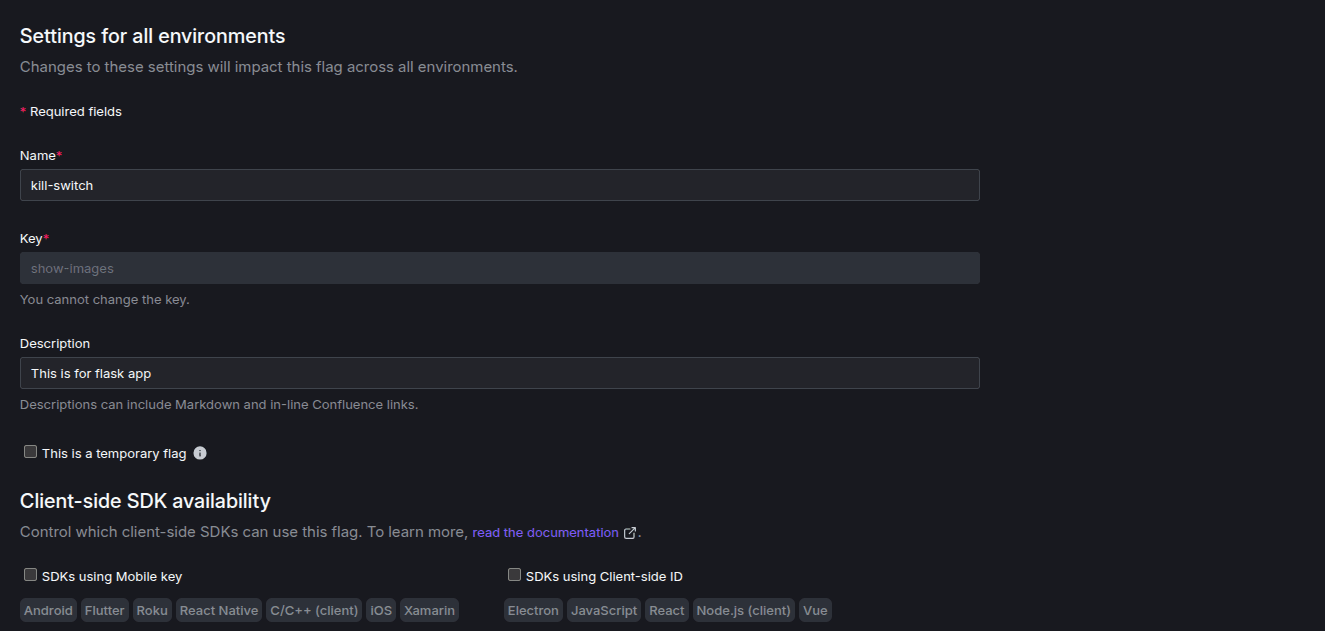
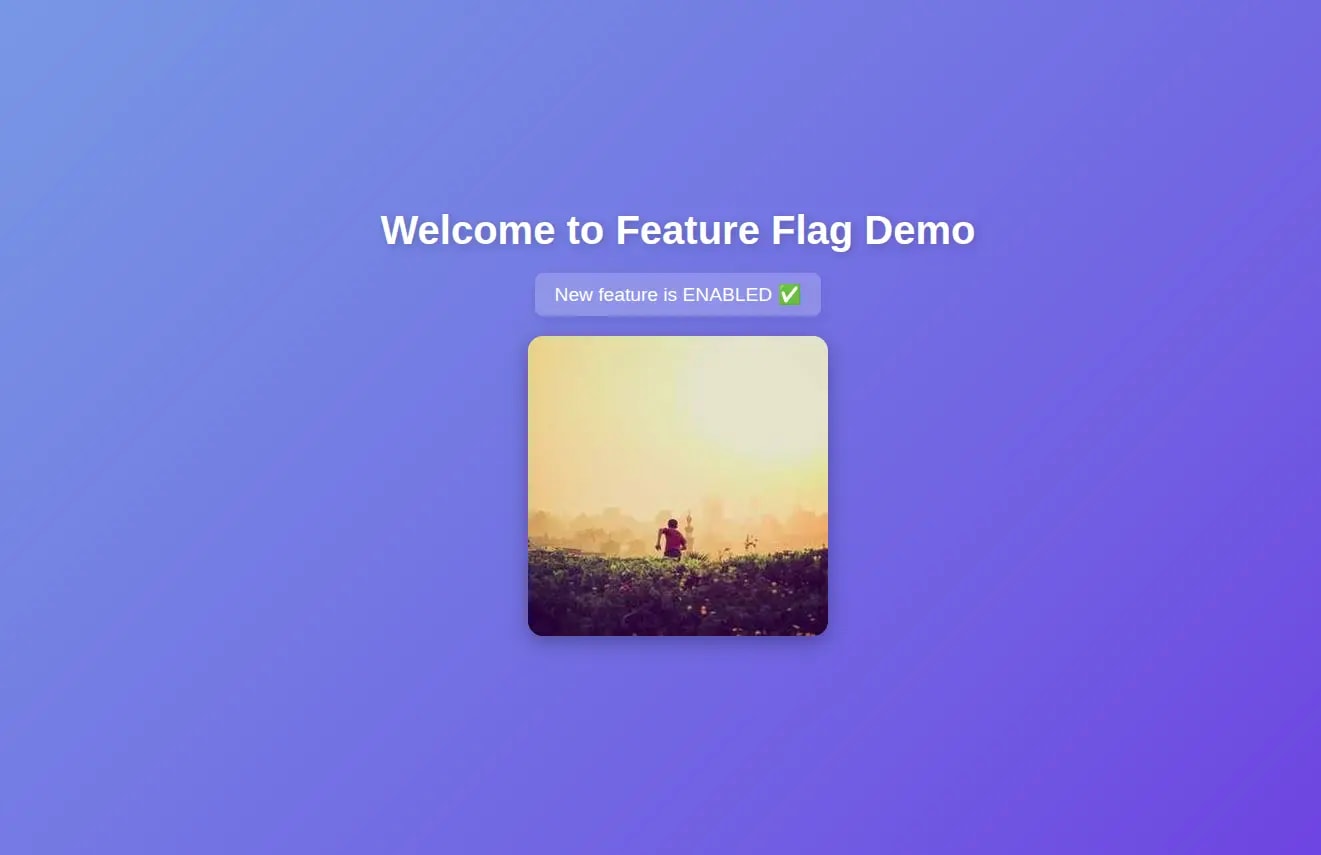
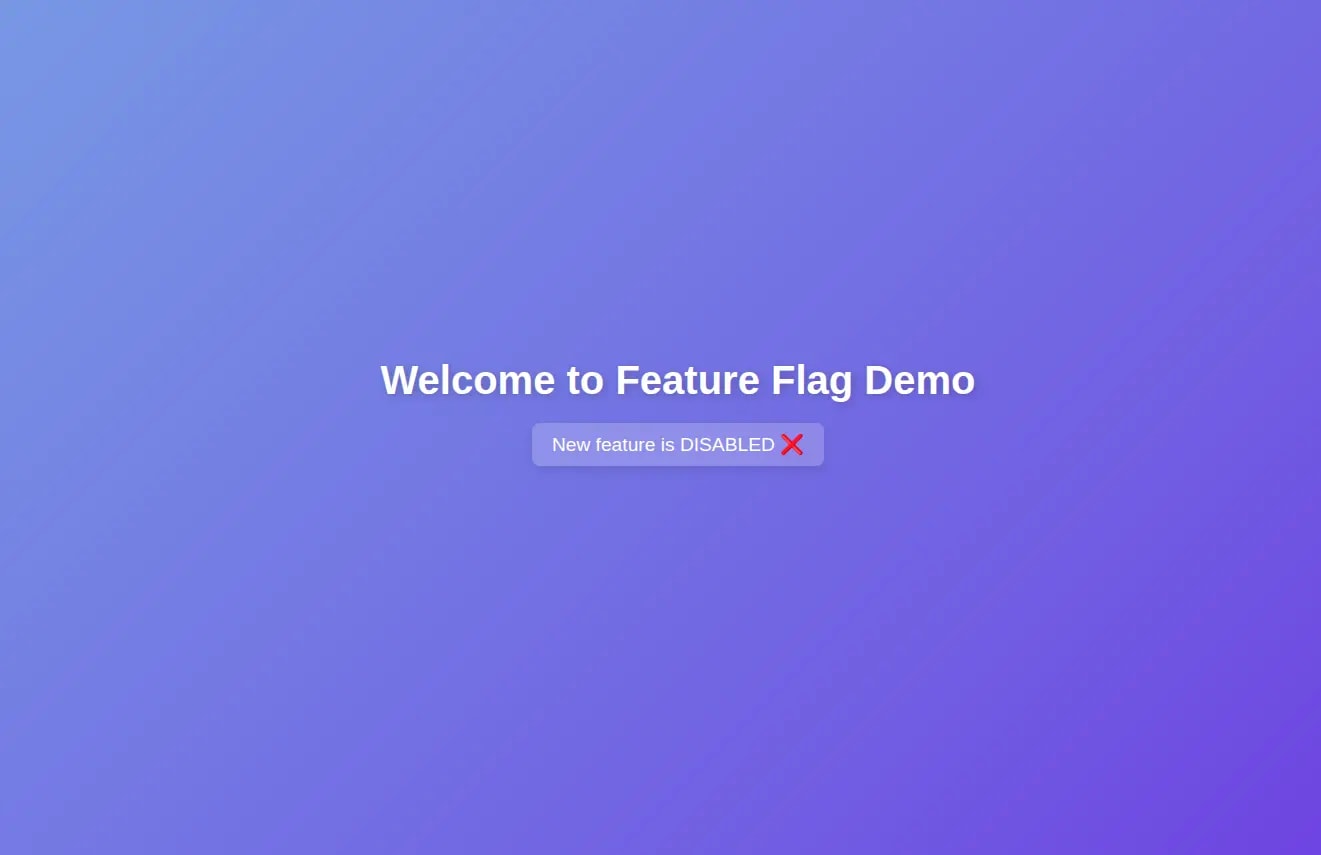
Once done, you are now ready to enable or disable a feature using the kill switch approach just by pressing the button ON/OFF to the button.
When the Button is on you will see.
When the Button is off you will see.
- Segments Approach Implementation
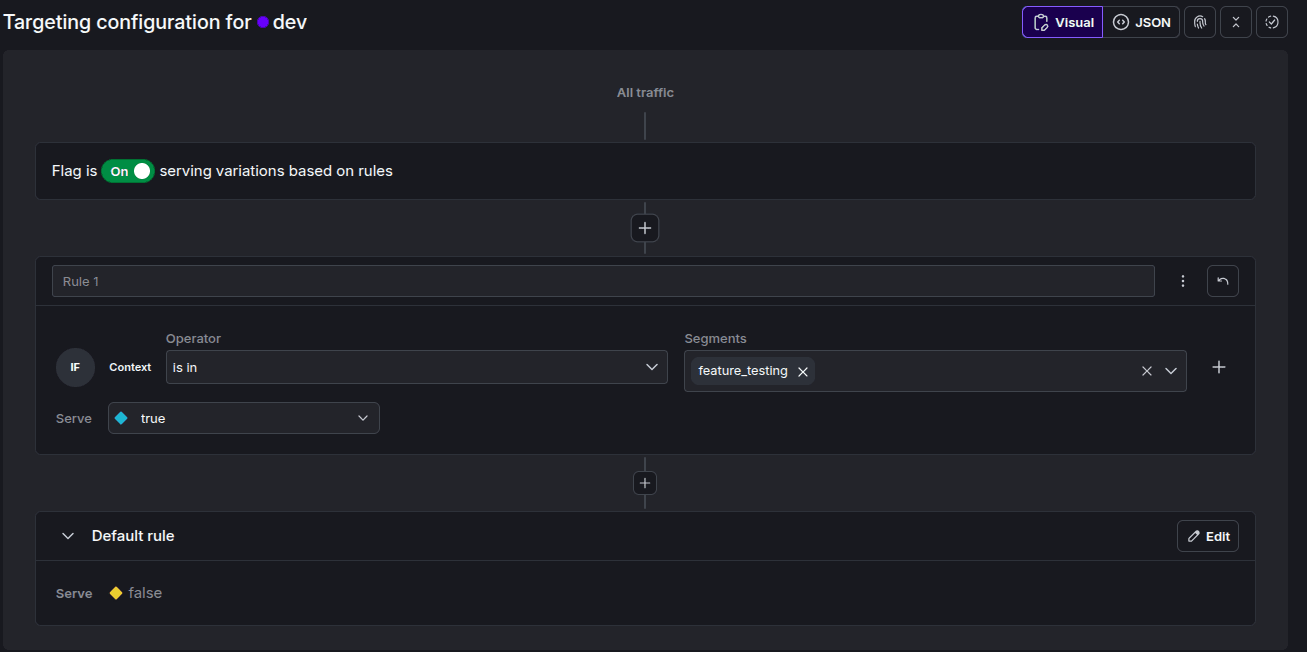
This approach will help us to target specific user groups by email. Make a segment in LaunchDarkly UI. attach a rule to it, i.e, if user's email ends with cloudraft[dot]io.

Once done make a flag and attach the segment with it setting up default value to false.
The code below can be used for manual percentage, progressive rollout.
def segmentation_feature(email):
    """Enables feature based on user segment (email attribute)."""
    context = get_context(f"user-{email}", name=email, email=email)
    flag_value = client.variation("show-images", context, False)
    return render_template("index.html", show_image=flag_value, email=email)
python- Manual Percentage Approach
This approach targets X% of users to enable Y features. Make a flag in LaunchDarkly lets says “rollout” and make percent 40% true and 60% false.
def rollout():
    """Simulates a progressive rollout using LaunchDarkly percentage rules."""
    email = request.args.get("email") or "[email protected]"
    name = email.split("@")[0]

    context = get_context(email, name, email)
    flag_key = "progressive-rollout"
    enabled = client.variation(flag_key, context, False)

    if enabled:
        message = "New feature is ENABLED for you (part of rollout)"
        color = "green"
    else:
        message = "Feature not yet available (still rolling out)"
        color = "gray"

    return render_template("index.html", message=message, color=color, email=email)
python
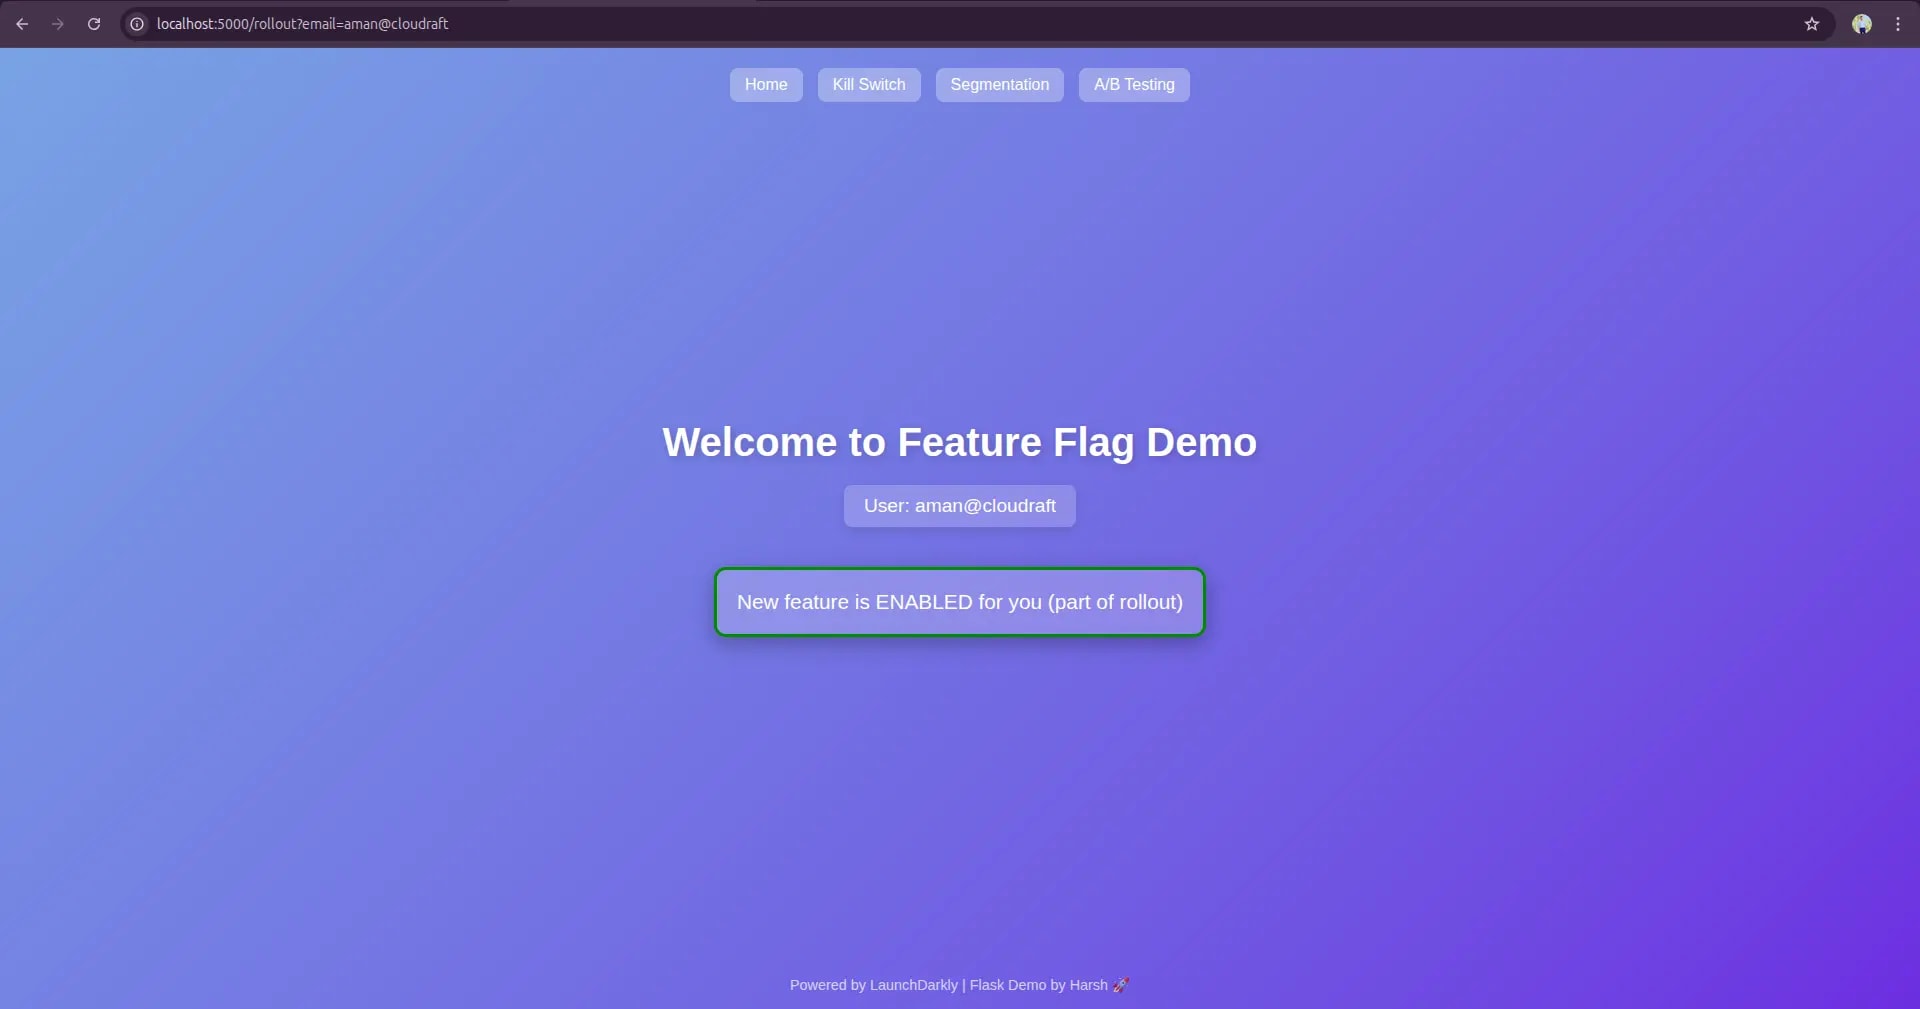
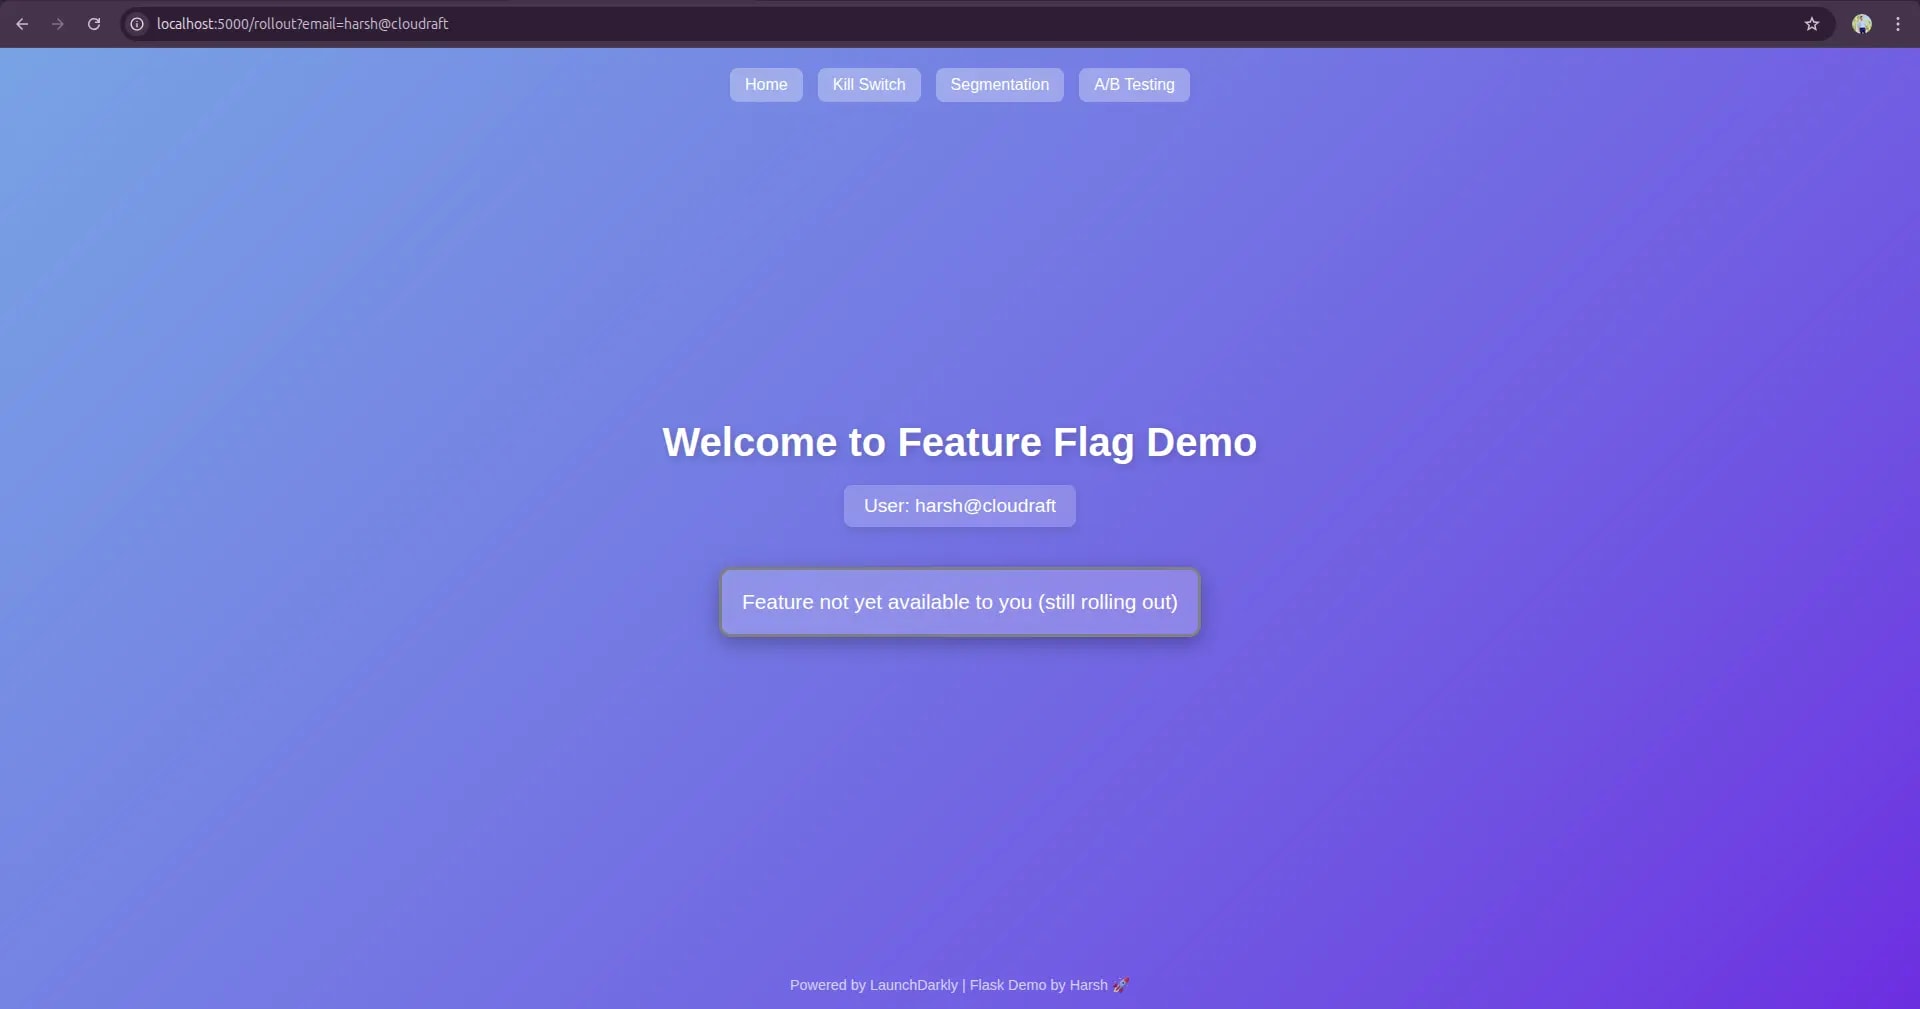
You will see the difference, user Aman comes under 40% and user Harsh comes in 60%.
- Progressive Rollout-Based Approach
This approach is similar to manual percent based approach, but instead of increasing percent manually you set an interval for the percentage, for example, enable a feature for 5% users every 6 hours.
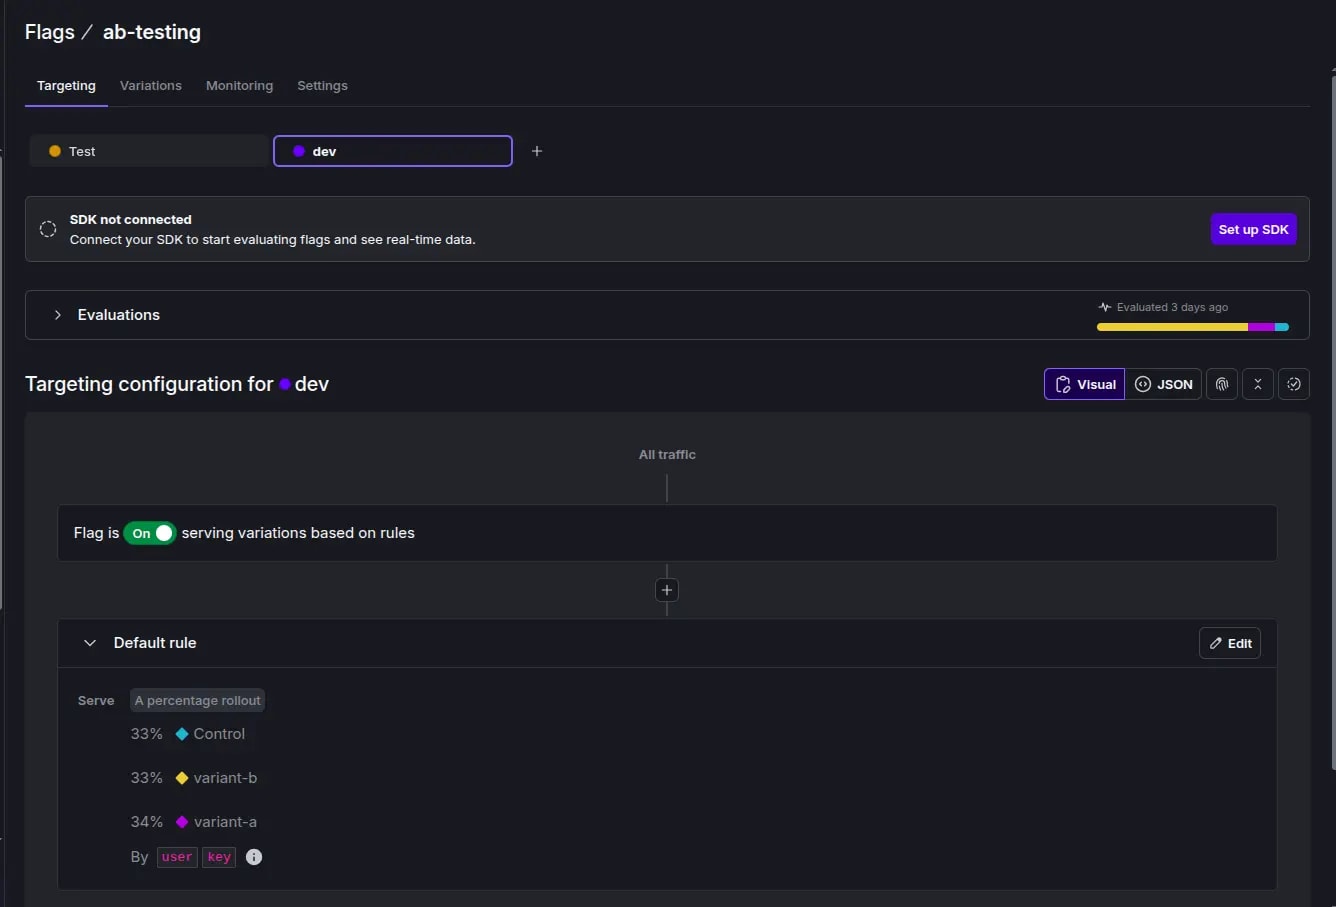
- A/B Testing This allows teams to test different versions (variants) of the same feature. Define variants, let's say variant-a, variant-b, and control, and assign 33%, 33 % and 34% to them. This means 33% users will have variant-a, 33% users will have variant-b, and the rest will have the control variant.
def ab_testing_feature():
    """Shows different variants for A/B test."""
    email = request.args.get("email") or "[email protected]"
    name = email.split("@")[0]

    context = get_context(email, name, email)
    variation = client.variation("ab-testing", context, "control")

    print(f"LaunchDarkly returned variant: {variation}")

    if variation == "control":
        message, color = "You are in the CONTROL group", "gray"
    elif variation == "variant-a":
        message, color = "You are seeing VARIANT A", "green"
    elif variation == "variant-b":
        message, color = "You are seeing VARIANT B", "blue"
    else:
        message, color = "Unexpected variant received", "red"

    return render_template("index.html", message=message, color=color, email=email)
python
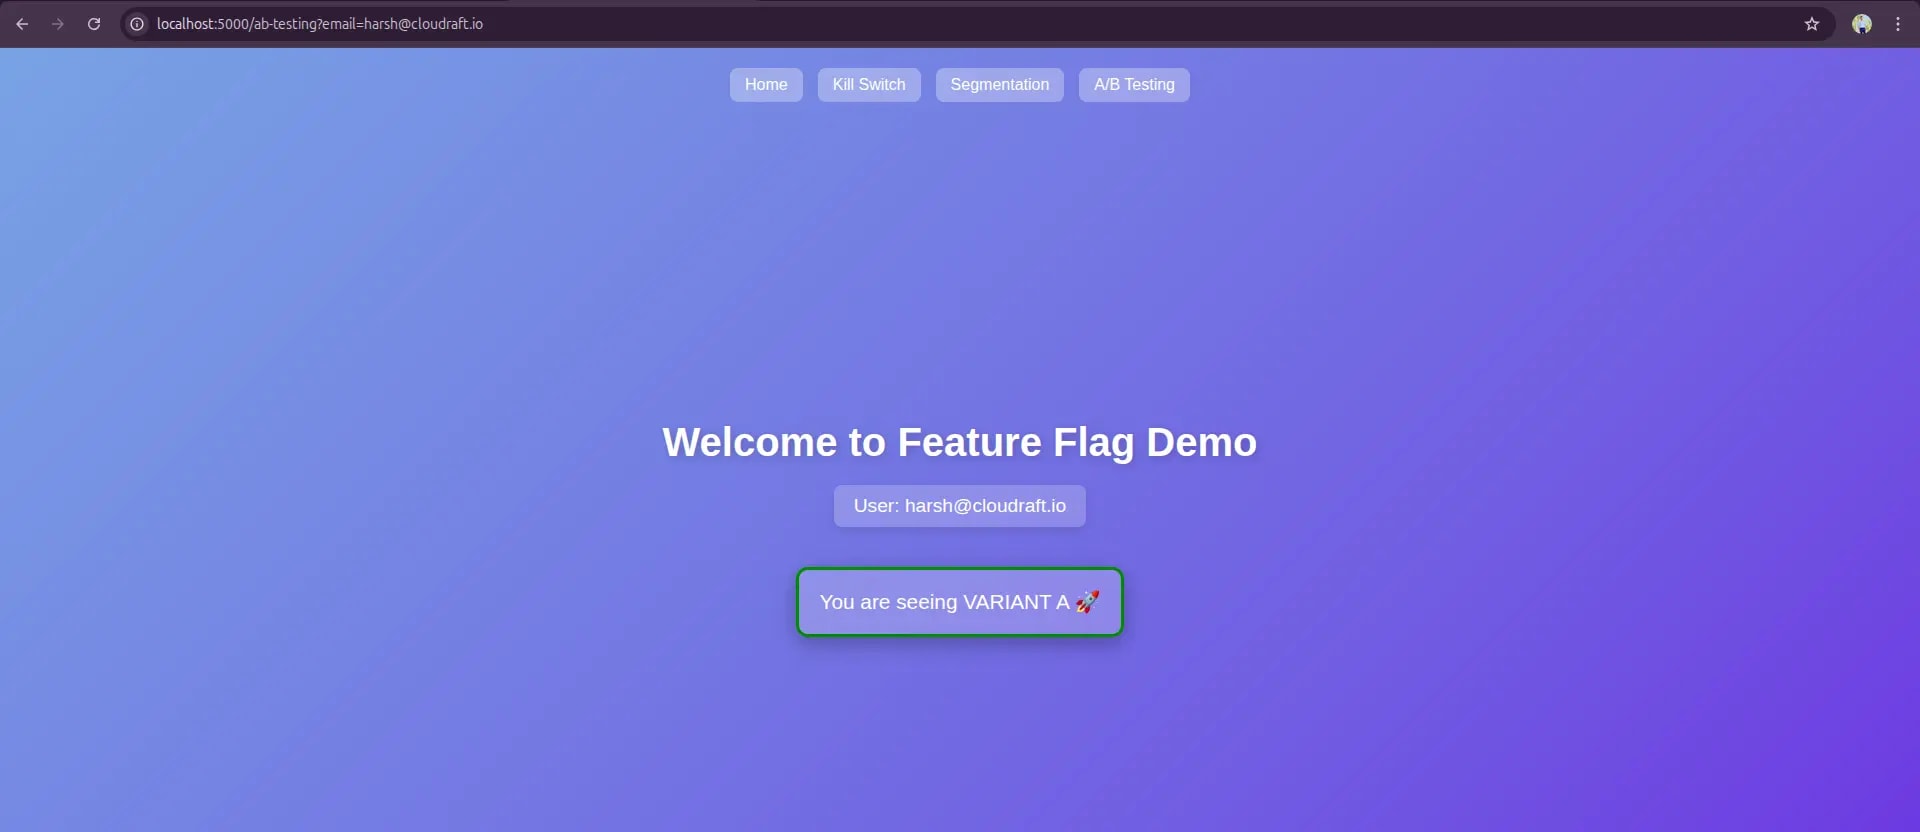
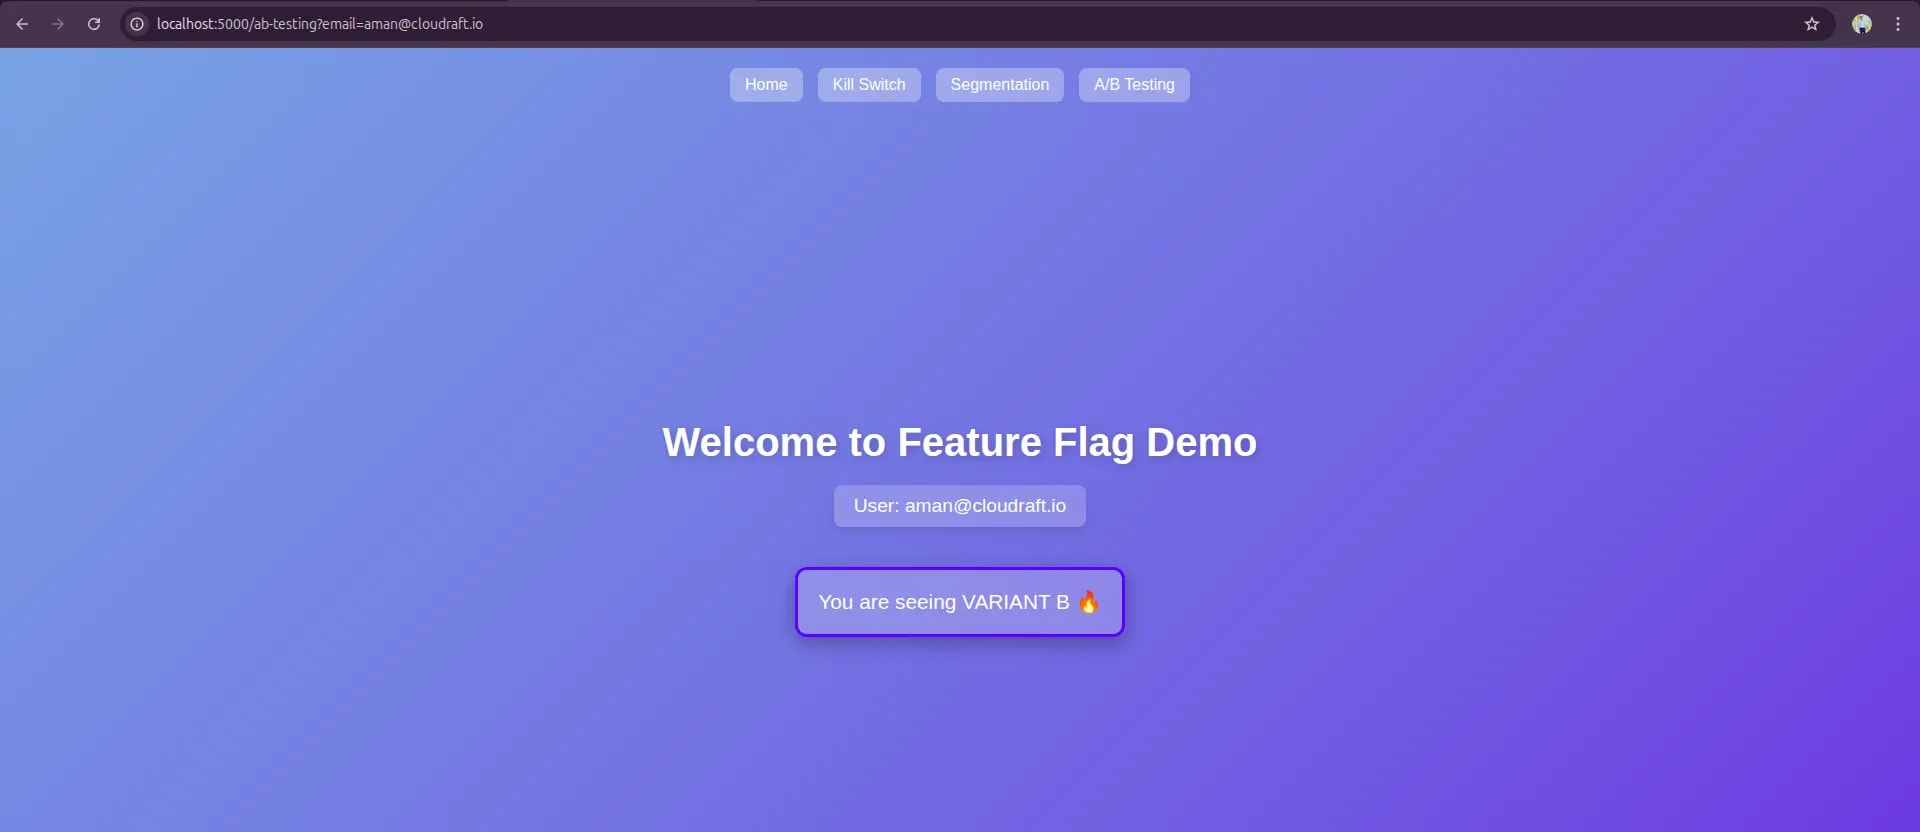
And you will see something like
- Guarded Rollout
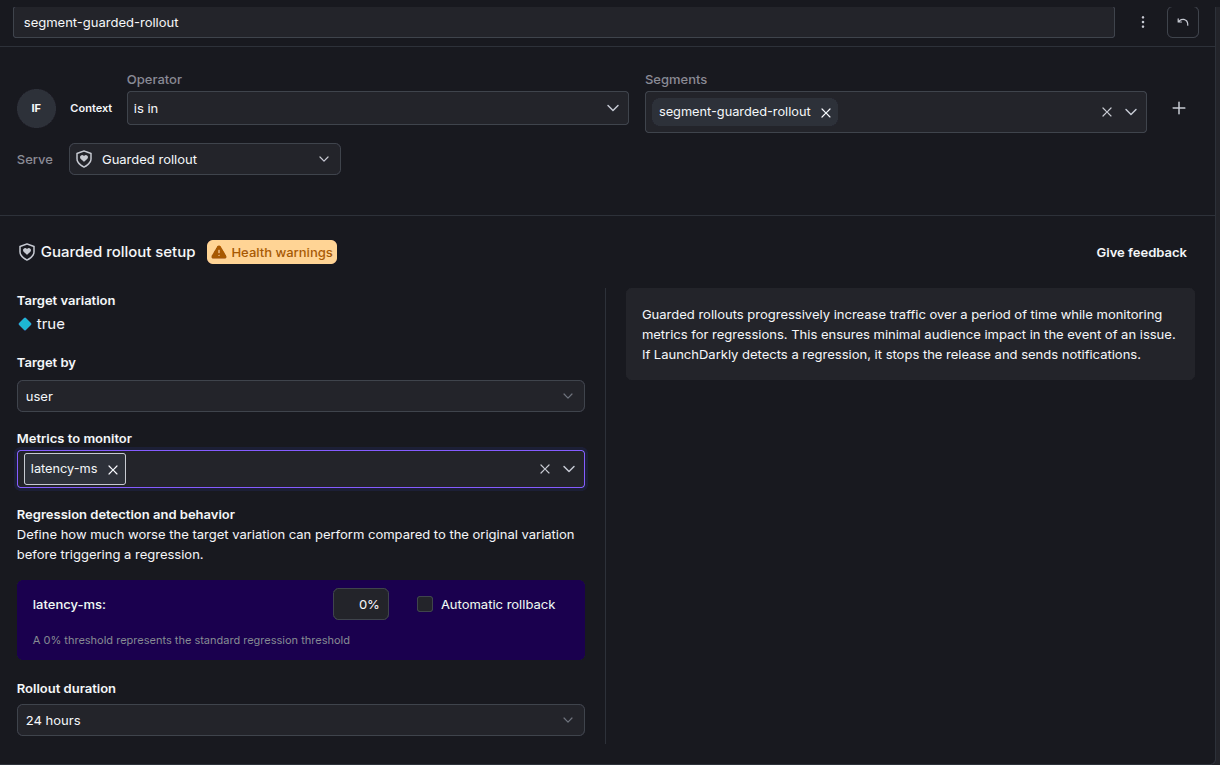
Enabling metrics-based rollout, create metrics in the launch Darkly UI named latency-ms and link this with the guardrill option inside the flag.
Implement the key in code
def guarded_rollout(user):
    """Combines segment-based rollout with latency-based guardrail."""
    user_info = {
        "1": ("user-1", "[email protected]", "premium"),
        "2": ("user-2", "[email protected]", "free"),
    }

    user_id, email, plan = user_info.get(user, ("unknown", "unknown", "free"))
    context = get_context(user_id, email, email, plan)

    flag_key = "segment-guarded-rollout"
    enabled = client.variation(flag_key, context, False)

    # Simulated system metric (latency)
    simulated_latency = random.uniform(100, 600)
    threshold = 350  # acceptable latency in ms

    if simulated_latency > threshold:
        enabled = False
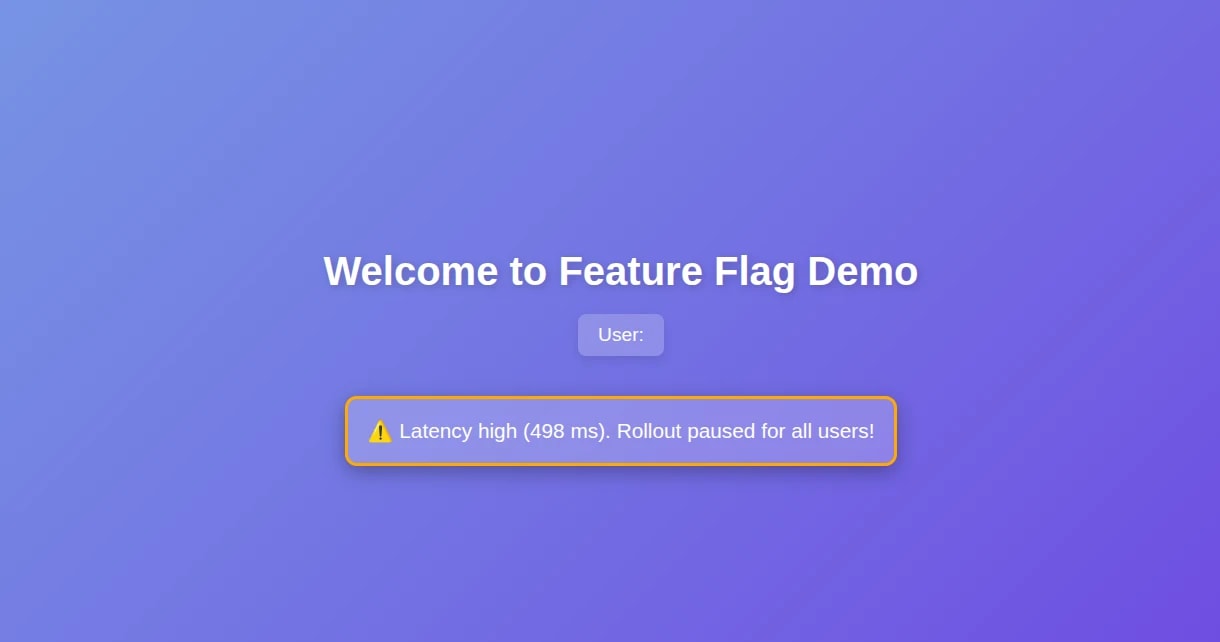
        message = f"Latency high ({simulated_latency:.0f} ms). Rollout paused for all users!"
        color = "orange"
    elif enabled:
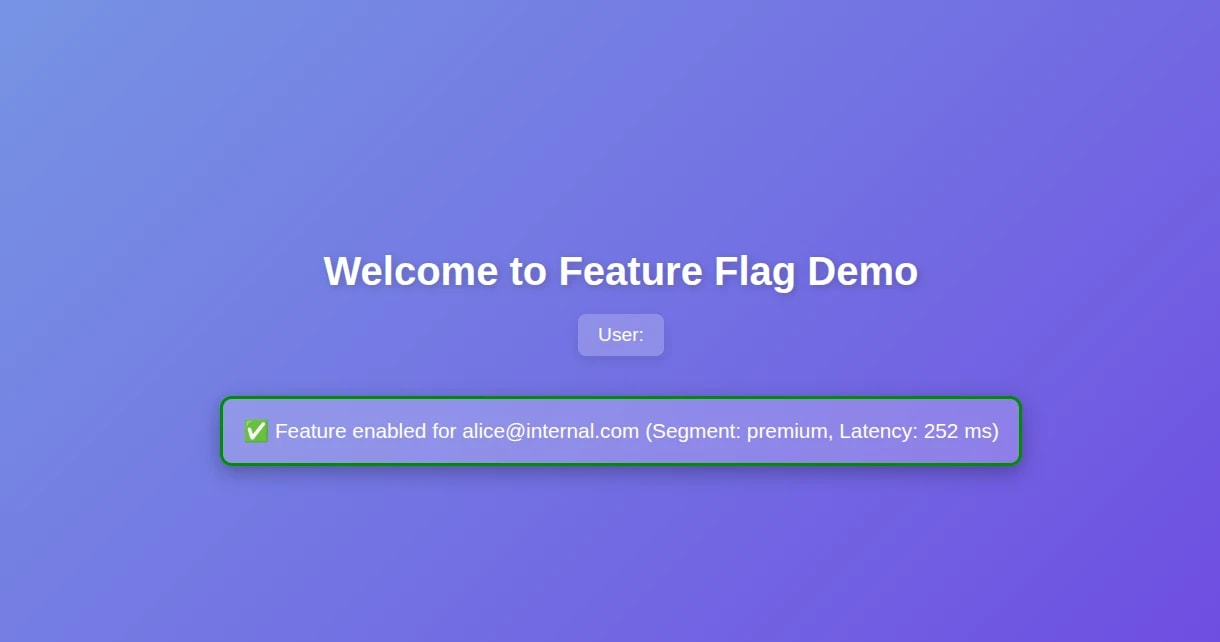
        message = f"Feature enabled for {email} (Segment: {plan}, Latency: {simulated_latency:.0f} ms)"
        color = "green"
    else:
        message = f"Feature disabled for {email} (Segment: {plan})"
        color = "red"

    return render_template("index.html", message=message, color=color)
python
You will see the output as
And once the latency get high then
Rest of the code which call all the functions and enable the routes
@app.route("/")
def home():
    """Home page showing all demos."""
    return """
    <h2>LaunchDarkly Feature Flag Demo</h2>
    <ul>
        <li><a href='/kill-switch'>Kill Switch</a></li>
        <li><a href='/[email protected]'>Segmentation</a></li>
        <li><a href='/[email protected]'>A/B Testing</a></li>
        <li><a href='/[email protected]'>Progressive Rollout</a></li>
        <li><a href='/guarded/1'>Guarded Rollout (Segment + Metric)</a></li>
    </ul>
    """


@app.route("/kill-switch")
def kill_switch():
    return kill_switch_feature()


@app.route("/segment", methods=["GET", "POST"])
def segment():
    email = request.args.get("email") or request.form.get("email")
    return segmentation_feature(email)


@app.route("/ab-testing")
def ab_testing():
    return ab_testing_feature()


@app.route("/rollout")
def rollout():
    return progressive_rollout_feature()


@app.route("/guarded/<user>")
def guarded(user):
    return guarded_rollout(user)

python
HTML code for UI
<!DOCTYPE html>
<html lang="en">
  <head>
    <meta charset="UTF-8" />
    <meta name="viewport" content="width=device-width, initial-scale=1.0" />
    <title>Feature Flag Demo</title>
    <style>
      * {
        margin: 0;
        padding: 0;
        box-sizing: border-box;
        font-family: 'Poppins', sans-serif;
      }

      body {
        background: linear-gradient(135deg, #74abe2, #5563de);
        color: #fff;
        min-height: 100vh;
        display: flex;
        flex-direction: column;
        align-items: center;
        justify-content: center;
        text-align: center;
        padding: 20px;
      }

      h1 {
        font-size: 2.5rem;
        margin-bottom: 20px;
        text-shadow: 2px 2px 8px rgba(0, 0, 0, 0.2);
      }

      p {
        font-size: 1.2rem;
        margin-bottom: 20px;
        background: rgba(255, 255, 255, 0.2);
        padding: 10px 20px;
        border-radius: 8px;
        display: inline-block;
        box-shadow: 0 4px 10px rgba(0, 0, 0, 0.1);
      }

      img {
        border-radius: 15px;
        box-shadow: 0 6px 20px rgba(0, 0, 0, 0.3);
        transition: transform 0.3s ease, box-shadow 0.3s ease;
        width: 300px;
        height: auto;
      }

      img:hover {
        transform: scale(1.05);
        box-shadow: 0 8px 30px rgba(0, 0, 0, 0.4);
      }

      .message-box {
        background: rgba(255, 255, 255, 0.2);
        padding: 20px;
        border-radius: 12px;
        box-shadow: 0 6px 20px rgba(0, 0, 0, 0.3);
        font-size: 1.3rem;
        border: 3px solid white;
        margin-top: 20px;
      }

      nav {
        position: absolute;
        top: 20px;
        display: flex;
        gap: 15px;
      }

      nav a {
        text-decoration: none;
        background: rgba(255, 255, 255, 0.3);
        color: #fff;
        padding: 8px 15px;
        border-radius: 8px;
        transition: background 0.3s ease;
      }

      nav a:hover {
        background: rgba(255, 255, 255, 0.6);
        color: #333;
      }

      footer {
        position: absolute;
        bottom: 15px;
        font-size: 0.9rem;
        color: rgba(255, 255, 255, 0.7);
      }

      @media (max-width: 600px) {
        h1 {
          font-size: 2rem;
        }

        p {
          font-size: 1rem;
        }

        img {
          width: 90%;
        }

        nav {
          flex-direction: column;
          gap: 10px;
          top: 10px;
        }
      }
    </style>
  </head>
  <body>
    <!--Simple Navigation for Client Demo -->
    <nav>
      <a href="/">Home</a>
      <a href="/kill-switch">Kill Switch</a>
      <a href="/segment?email=">Segmentation</a>
      <a href="/ab-testing">A/B Testing</a>
    </nav>

    <h1>Welcome to Feature Flag Demo</h1>
    <p>User: {{ email }}</p>

    {% if message %}
    <!-- A/B Testing -->
    <div class="message-box" style="border-color: {{ color }};">
      {{ message }}
    </div>

    {% elif show_image is defined %}
    <!-- Kill Switch / Segmentation -->
    {% if show_image %}
    <p>Feature Enabled for you!</p>
    <img src="https://picsum.photos/300" alt="Feature Image" />
    {% else %}
    <p>Feature Disabled for you.</p>
    {% endif %} {% else %}
    <p>No feature flag data available.</p>
    {% endif %}

    <footer>Powered by LaunchDarkly | Flask Demo by Harsh 🚀</footer>
  </body>
</html>
html
Key Takeaway
Here are some takeaways from the learning.
- Feature flags make releases safer by separating code deployment from when a feature is actually turned on for users.
- Gradual rollouts help protect reliability, and new features can be released slowly while keeping an eye on key metrics like latency or error rate.
- Better visibility during incidents, by tracking which feature was active, You can quickly find what caused a performance issue and take action faster.
- Improved visibility and accountability, every feature toggle becomes an audit point for reliability decisions.
Conclusion
Platform engineering teams have been adopting Feature flagging as one of the most powerful techniques to release software safely. You can improve the reliability and velocity of your software delivery process by using feature flags effectively. Feature flags also help you manage feature dependencies, reduce technical debt, and improve collaboration between teams by adding fine-grained control over feature availability.
