Introduction
Kubernetes has taken the default position in the production stacks but we often miss to make it production-ready. While running Kubernetes in development or staging environments might seem straightforward, deploying it in production is a completely different challenge. Production environments demand high availability, security, scalability, and resilience. If these aspects are overlooked, the result can be outages, security breaches, or performance bottlenecks.
So, what does production-ready mean? It means your Kubernetes cluster and workloads are configured to handle real-world conditions, including unexpected failures, traffic spikes, security threats, and maintenance activities. Kubernetes gives us flexibility and power, but to unlock its full potential, you need to follow best practices to ensure performance, security, and reliability at scale. This blog will walk you through essential components and the best key practices that ensure your Kubernetes deployment is robust, secure, and highly available in production.
Foundational Setup
Before diving into complex configurations, your cluster’s foundation needs to be solid. Here are three critical components to get right:
RBAC & Service Accounts
Role-Based Access Control (RBAC) forms the security foundation of any production Kubernetes cluster. It ensures that pods, users, and services have only the minimum permissions necessary to function.
When a pod communicates with the Kubernetes API server, it needs credentials for authentication. These credentials are provided by a Service Account.
By default, Kubernetes assigns the default service account to pods if none is specified. However, granting roles to the default account is risky because any pod that does not define its own service account will inherit those permissions. This could lead to privilege escalation across multiple applications. Below is an example of creating and granting permissions.
Example:
apiVersion: v1
kind: ServiceAccount
metadata:
  name: my-service
---
apiVersion: rbac.authorization.k8s.io/v1
kind: Role
Metadata:
  namespace: default
  name: pod-reader
rules:
  - apiGroups: ['']
    resources: ['pods']
    verbs: ['get', 'watch', 'list']
---
apiVersion: rbac.authorization.k8s.io/v1
kind: RoleBinding
metadata:
  name: read-pods
  namespace: default
subjects:
  - kind: ServiceAccount
    name: my-service
    namespace: default
roleRef:
  kind: Role
  name: pod-reader
  apiGroup: rbac.authorization.k8s.io
yaml
What this does:
Creates a service account named my-service in the default namespace, this YAML file defines the Role name pod-reader that allows the actions get, watch and list on pods resources. Then it creates a RoleBinding named read-pods that binds this role to my-service.
Best Practices
- Remove unnecessary bindings for the
system: unauthenticatedgroup to prevent unrestricted API access. - Disable automatic service account token mounting by setting
automountServiceAccountToken: falseto reduce credential exposure.
Resource Requests & Limits
This one is another area where effective resource management is crucial in a production environment to make sure that your applications run smoothly without overloading your infrastructure. Kubernetes allows you to set resource requests and limits for your application containers.
There are two main resource types to consider here; CPUs and memory. Both cpu and memory limits are applied by the kubelet and are ultimately enforced by the kernel. When a container reaches its maximum cpu limits then the kernel restricts its access but in case of memory there is a different story, a container can use more memory than its limits. however if the kernel detects memory pressure then it may start terminating with out of memory(OOM) kills.
Example:
resources:
  requests:
    memory: '64Mi'
    cpu: '250m'
  limits:
    memory: '128Mi'
    cpu: '500m'
yaml
You can set default limits using limit ranges and can define hard limits using ResourceQuota object at namespace level. You can always refer to the official documentation for an in-depth understanding of resource management.
Pod Disruption Budgets (PDBs)
Pod Disruption Budget (PDB) is a Kubernetes feature that protects application availability by ensuring that a minimum number of pods should be always available, of any workload caused by any voluntary disruptions such as node draining, cluster upgrade or scaling operations.
PDBs ensure a minimum number of replicas remain available using minAvailable or a maximum number are unavailable using maxUnavailable. Below is an example of how we can configure PDB.
Example of PDB using minAvailable:
apiVersion: policy/v1
kind: PodDisruptionBudget
metadata:
  name: my-app-pdb
spec:
  minAvailable: 2
  selector:
    matchLabels:
      app: my-app
yaml
Create PDB object using kubectl:
kubectl apply -f mypdb.yaml
bash
Use Below kubectl command for draining nodes:
kubectl drain --ignore-daemonsets <node-name>
bash
If you have a deployment with 5 replicas and you have set a minAvailable: 2 in your pdb manifest file then Kubernetes will ensure that at least 2 pods from targeted deployment must remain available during disruption.
Note: PDBs only apply to voluntary disruptions like actions taken by administrators or developers & also they do not work if the entire deployment or service is being deleted.
Configuration And Secrets Management
ConfigMaps
A ConfigMap is an API object used to pass configuration data in the form of key-value pairs in Kubernetes & Values can be strings or base64-encoded binary data. When the pod is created, inject the ConfigMap into the pod so that key-value pairs become available as an environment variable for the application hosted inside the container in the pod.
So there are two phases involved in configuring ConfigMaps. First, create the ConfigMap and Second, inject them into the pod. Just like any other kubernetes object, there are two ways of creating a ConfigMaps. The imperative way without using ConfigMap definition file and second one is declarative by using definition file. So let’s take a look at both ways one by one in the examples below.
Imperative Way:
$ kubectl create configmap \
  <config-name> --from-literal=<key>=<value>
bash
So while creating the ConfigMap, just run the kubectl create configmap command followed by its name and the option --from-literal which is used to specify the key-value pairs. But if there are so much configuration data then we can create a ConfigMap through a file.
$ kubectl create configmap \
  <config-name> --from-file=<path-to-file>
bash
Declarative Way:
For a declarative approach, we need to create a definition manifest file for ConfigMap like below i have mentioned.
apiVersion: v1
kind: ConfigMap
metadata:
  name: my-config
data:
  database_user: admin
  database_pass: secret123
yaml
Let us proceed with phase two, configuring it with pod, we can retrieve the key-value data of an entire ConfigMap or the values of specific ConfigMap keys as environment variables. Check the below example where I have injected the entire ConfigMap file into a pod definition file.
apiVersion: v1
kind: Pod
metadata:
  name: my-app
spec:
  containers:
    - name: my-app
      image: redis
      ports:
        - containerPort: 8080
      envFrom:
        - configMapRef:
            name: my-config
yaml
There are multiple ways to inject ConfigMap into the pod, as a single env variable or whole data as a file in a volume. you can visit official documentation of kubernetes for an in-depth knowledge of ConfigMap.
Secrets
A Secret is used to store sensitive data or information like passwords, a key, and tokens. They are similar to ConfigMap except that they are stored in an encoded format. As with ConfigMap, there are two steps involved in working with secrets. First, Create the secret, and second, inject it into a pod.
There are two ways of creating a secret. The imperative way, without using a secret definition file, and the declarative way, by using a definition file. We have discussed imperative as well as declarative ways in a ConfigMap section earlier in this blog. So here are examples of both the ways below.
Imperative Way:
$ kubectl create secret generic \
  <secret-name> --from-literal=<key>=<value>
bash
If we have too many secrets to pass in then we can create a secret data through file.
$ kubectl create secret generic \
  <secret-name> --from-file=<path-to-file>
bash
Declarative Way:
For a declarative approach, we need to create a definition file for Secret like below i have mentioned.
apiVersion: v1
kind: Secret
metadata:
  name: my-app-secret
data:
  DB_Host: bXlzcWw=
  DB_User: cm9vdA==
  DB_Pass: UGFzczEyMw==
yaml
Let us proceed with phase two, configuring it with pod:
apiVersion: v1
kind: Pod
metadata:
  name: my-app
spec:
  containers:
    - name: my-app
      image: redis
      ports:
        - containerPort: 8080
      envFrom:
        - secretRef:
            name: my-app-secret
yaml
Remember that secrets encode data in base64 format. Anyone with the base64 encoded secret can easily decode it. As such the secrets can be considered not very safe.
Best Practices To Handle Secrets:
- Not checking in secret object definition files to source code repositories.
- Secrets are not encrypted in ETCD, So Enable Encryption at rest for secrets so they are stored encrypted in ETCD.
- Anyone able to create pods/deployments in the same namespace can access the secrets, so configure least-privilege access to Secrets - RBAC
- Consider using external secret store providers like AWS Provider, Azure Provider, GCP and Vault Provider. Visit the official page for more information.
- Use the External Secrets Operator(ESO) to integrate Kubernetes with external secret managers, syncing secrets directly into the cluster in a secure and automated way.
Networking
Networking in Kubernetes makes it possible for pods to communicate with each other, with services inside the cluster, and with users outside the cluster. It covers core concepts like Services for stable access, Network Policies for traffic control and security boundaries, and Ingress Controllers for managing external traffic (HTTP/HTTPS) into the cluster. Lets discuss these points and understand how to implement them in production ready environments.
Services
In Kubernetes, a Service is a method for exposing a network application that is running as one or more pods in your cluster.
In Kubernetes, a Service provides a stable way for pods to communicate with each other or with external systems. It acts as a bridge between components, whether that’s linking a frontend to its backend or exposing applications to users, ensuring reliable and decoupled communication across microservices.
Types of Services
Kubernetes offers different service types, each designed for specific use cases:
-
ClusterIP – The default type, used for internal communication within the cluster (e.g., frontend connecting to backend).
-
NodePort – Exposes a pod on a port of each cluster node, making it accessible from outside the cluster.
-
LoadBalancer – Works with cloud providers to create an external load balancer that distributes traffic across pods.
-
Headless Service – Doesn’t assign a cluster IP but instead exposes the individual pod IPs, giving clients direct access. Often used with StatefulSets or databases for service discovery.
Creating NodePort Service:
The process of creating a NodePort service starts with defining the service in a YAML file and then connecting it to a specific pod definition file using selectors. Lets check the example below where we have created a service definition file.
apiVersion: v1
kind: Service
metadata:
  name: frontend-service
spec:
  type: NodePort
  ports:
    - targetPort: 80
      port: 80
      nodePort: 30008
  selector:
    app: frontend-app
    type: frontend
yaml
Now, save the file as frontend-service.yaml and create the service using the below command.
kubectl create -f frontend-service.yaml & verify using kubectl get services
In production, applications often run across multiple pods for scalability and high availability. Services detect pods with matching labels and route traffic to them, distributing requests in a round-robin fashion. Even across different nodes, Kubernetes maps the target port on all nodes, ensuring reliable external access.
Network Policies
By default, Kubernetes allows all pods in a cluster to communicate with each other without restrictions. While this makes initial development easier, it isn’t always ideal for production environments where stricter security is required.
Network Policies provide a way to control this communication. They are a set of rules that define which pods or external endpoints a pod is allowed to connect with. Any pod not covered by a Network Policy will continue to accept traffic from any source.
Example:
Imagine a simple setup with three components i.e. a web server, an API server, and a database. The communication happens in this order:
-
A user sends a request to the web server on port 80.
-
The web server passes the request to the API server on port 5000.
-
The API server queries the database on port 3306 and then returns the result to the user.

So, There are two types of network traffic consist i.e. Ingress traffic and Egress traffic, where ingress represents incoming traffic and egress represents the outgoing traffic respectively.
Setup Network Policies
In some cases, you may want to prevent certain components from talking directly to each other. For instance, if your security rules require that the front-end web server should not have direct access to the database, you can enforce this with a Network Policy.
Such a policy can be designed to allow only the API server to connect to the database on port 3306, while blocking all other traffic. In Kubernetes, a Network Policy is a resource object that applies rules to selected pods based on labels and selectors, ensuring that only approved connections are permitted.
apiVersion: networking.k8s.io/v1
kind: NetworkPolicy
metadata:
  name: db-network-policy
spec:
  podSelector:
    matchLabels:
      role: db
  policyTypes:
    - Ingress
  ingress:
    - from:
        - podSelector:
            matchLabels:
              name: api-pod
      ports:
        - protocol: TCP
          port: 3306
yaml
In this above example:
-
podSelector is used to identify the database pod via its label.
-
policyTypes defines that the rule applies only to ingress(incoming) traffic.
-
The ingress rule explicitly permits connections from pods labeled name: api-pod on TCP port 3306.
Going Beyond with Cilium
Kubernetes native policies are good for basic ingress/egress rules, but they lack advanced features needed in production. This is where Cilium, an open-source CNCF project, comes in.
Cilium is powered by eBPF and enhances network security with:
-
Pod-to-pod encryption applied transparently without app changes
-
Fine-grained, identity-based policies beyond just IP/port rules
-
Layer 7 controls for protocols like HTTP, gRPC, Kafka
By combining Kubernetes Network Policies with Cilium, you can achieve stronger security, encrypted pod communication, and better visibility into traffic across your cluster.
Finally if you want to get more information about the network policy like adding policy to namespaces or configure egress as well then visit kubernetes official website.
Ingress
Ingress in Kubernetes is a resource that manages external access to services within a cluster, typically HTTP or HTTPS traffic.Lets see a simple example where an Ingress sends all its traffic to one Service in below diagram.

Image Source: Kubernetes
What is Ingress?
Ingress streamlines external access to Kubernetes workloads by exposing them through a single, externally reachable IP. It supports features like URL-based routing, SSL/TLS termination, and authentication, essentially working as a built-in Layer 7 load balancer.
That said, Ingress still requires an entry point such as a NodePort or a Cloud LoadBalancer for initial exposure. Once this is in place, all routing and configuration changes are handled by the Ingress Controller.
Without Ingress, teams would need to deploy and maintain their own reverse proxy or load balancer (like NGINX, HAProxy, or Traefik) to handle URL routing and certificate management. Ingress takes these responsibilities and provides them in a standardized, integrated way.
Gateway API – An Alternative to Ingress
While Ingress has been the standard way to expose HTTP/S traffic in Kubernetes, the Gateway API is emerging as its successor. It provides a more expressive and extensible model for managing traffic into clusters. Unlike Ingress, which is limited mostly to Layer 7 (HTTP/S) rules, the Gateway API supports multiple protocols, richer traffic routing, and role-oriented resource design (Gateway, Route, Listener). This makes it more flexible for complex production environments.
Deploying an Ingress Controller
To use Ingress, you must first deploy an Ingress controller. The controller continuously monitors the cluster for changes in Ingress resources and reconfigures the underlying load balancing solution accordingly.
There are multiple Ingress controllers you can choose from, such as NGINX, GCE, Contour, HAProxy, Traefik, and Istio. Out of these, GCE and NGINX are currently being supported and maintained by the kubernetes project.
A typical setup usually involves:
-
A Deployment running the Ingress Controller pods.
-
A Service (NodePort or LoadBalancer) to expose the controller.
-
A ConfigMap for managing configuration parameters
-
A ServiceAccount and RBAC rules to give the controller permissions.
Once this is in place, you can move on to creating Ingress resources to define traffic routing for your applications.
Creating Ingress Resources
Once the Ingress Controller is running, you can define Ingress resources to control how external traffic is routed to Services inside your cluster.
Types of Ingress Rules:
-
Single Service
-
Path-based Routing
-
Host-based Routing
Here’s an example of path-based routing:
apiVersion: networking.k8s.io/v1
kind: Ingress
metadata:
  name: minimal-ingress
  annotations:
    nginx.ingress.kubernetes.io/rewrite-target: /
spec:
  ingressClassName: nginx-example
  rules:
    - http:
        paths:
          - path: /testpath
            pathType: Prefix
            backend:
              service:
                name: test
                port:
                  number: 80
yaml
For more in-depth information about ingress, you can explore kubernetes official documentation.
Reliability And High Availability
Readiness & Liveness Probes
Kubernetes uses liveness and readiness probes to monitor the health of pods. A liveness probe checks if a container is still running, and if it fails, Kubernetes restarts it. A readiness probe determines if a container is prepared to serve traffic, and if it fails, the pod is removed from Service endpoints. Together, these probes help keep applications stable and highly available in production. We will discuss both one by one along with examples.
Readiness Probes
A Readiness Probe determines if a container is prepared to serve traffic. Without it, Kubernetes assumes a container is ready as soon as it starts, which can cause requests to be routed to pods still warming up.
Example:
apiVersion: v1
kind: Pod
metadata:
  name: my-app
spec:
  containers:
    - name: my-app
      image: nginx
      ports:
        - containerPort: 8080
      readinessProbe:
        httpGet:
          path: /api/ready
          port: 8080
yaml
There are three primary types of readiness probes you can use:
- HTTP GET Probe
- TCP Socket Probe
- Exec Command Probe
A correctly configured readiness probe ensures that only pods that pass the readiness checks will receive traffic. This maintains a smooth user experience even during pod updates or scaling events.
Liveness Probes
A Liveness Probe checks whether a container is still running and healthy. If the probe fails, Kubernetes automatically restarts the container, helping to recover from crashes or deadlocks without manual intervention.
Liveness probes are defined within your pod's container specification in a manner similar to readiness probes. Below is an example of a complete pod definition that uses an HTTP GET liveness probe.
apiVersion: v1
kind: Pod
metadata:
  name: my-app
spec:
  containers:
    - name: my-app
      image: nginx
      ports:
        - containerPort: 8080
      livenessProbe:
        httpGet:
          path: /api/healthy
          port: 8080
yaml
Horizontal Pod Autoscaler (HPA)
In Kubernetes, a HPA automatically updates a workload resource such as a Deployment or StatefulSet, with the aim of automatically scaling the workload to match demand.
To overcome the limitations of manual scaling, Kubernetes provides the Horizontal Pod Autoscaler (HPA). It relies on the metrics-server to track resource usage, such as CPU, memory, or even custom metrics and automatically adjusts the number of pod replicas in a Deployment, StatefulSet, or ReplicaSet. If usage rises above a defined threshold, HPA adds more pods; when demand drops, it reduces them to save resources.
There are two ways of creating a HPA definition file, Imperative and Declarative but we will discuss the second one i.e. declarative method.
apiVersion: autoscaling/v2
kind: HorizontalPodAutoscaler
metadata:
  name: frontend-hpa
spec:
  scaleTargetRef:
    apiVersion: apps/v1
    kind: Deployment
    name: frontend-app
  minReplicas: 1
  maxReplicas: 10
  metrics:
    - type: Resource
      resource:
        name: cpu
        target:
          type: Utilization
          averageUtilization: 50
yaml
This HPA scales the my-app Deployment between 1 and 10 replicas based on CPU usage. When average CPU utilization goes above 50%, it adds pods, and when it’s below, it scales down to conserve resources.
Note that HPA, integrated into Kubernetes since version 1.23 so there is no separate installation required, relies on the metrics-server to obtain resource utilization data.
Kubernetes doesn’t limit autoscaling to just CPU and memory metrics. Along with the built-in metrics-server, you can use custom metrics adapters to pull data from other sources or external providers like Datadog or Dynatrace, enabling more advanced scaling decisions.
While HPA scales the number of pods to meet the demands. Vertical Pod Autoscaler (VPA) adjusts the resource requests and limits of pods automatically to optimize performance. On the other hand, KEDA extends Kubernetes scaling to event-driven scenarios (e.g., messages in a queue, Kafka topics, cloud events), making it ideal for scaling workloads based on external triggers. Together, these tools complement HPA to handle both resource-based and event-driven scaling in production environments.
Storage Data Management
In this section, we’ll discuss the key storage concepts in Kubernetes like Persistent Volumes, Persistent Volume Claims, and Storage Classes. You’ll see how these resources make it possible to provide reliable and reusable storage for applications.
Persistent Volumes (PVs)
Kubernetes pods are ephemeral by nature. When a pod gets deleted then data inside it is also lost. To retain this data, a volume is attached to the pod. Any data generated by the pod is stored in the volume and remains available even after the pod gets terminated.
In environments where many users will deploy multiple pods, duplicating storage configuration in every pod file can lead to redundancy and increased maintenance efforts. That is where persistent volume can help us in a true sense.
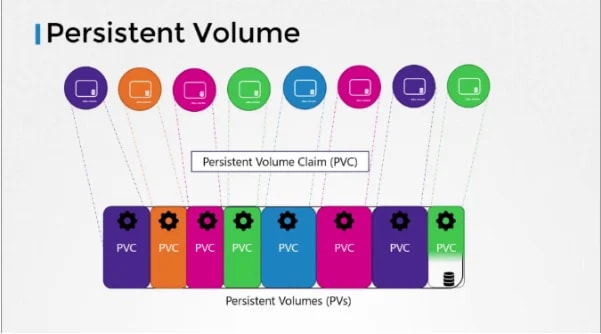
A persistent volume is a cluster-wide pool of storage volumes which is configured by administrators and later used by users deploying applications on the cluster. The users can now select storage from this pool using persistent volume claims.
Creating a Persistent Volume
apiVersion: v1
kind: PersistentVolume
metadata:
  name: my-pv-vol
spec:
  accessModes:
    - ReadWriteMany
  capacity:
    storage: 200Mi
  persistentVolumeReclaimPolicy: Retain
  hostPath:
    path: /tmp/data
yaml
In a production setup, replace the hostPath option with a supported storage solution, such as AWS Elastic Block Store, to ensure data durability and scalability.
awsElasticBlockStore:
  volumeID: <volume-id>
  fsType: ext4
yaml
Persistent Volume Claims (PVCs)
As we learned in the previous section on how to create persistent volumes, So now we will try to create persistent volume claims to make the storage available to nodes. PV and PVC are two different objects in kubernetes where administrator creates a set of persistent volumes and user creates a persistent volume claims to use storage. When a PVC is created, Kubernetes automatically binds it to a PV that meets the request and properties set to volume. Kubernetes tries to find persistent volume which meets the requirements by claim such as capacity, access modes, volume modes and storage classes.
Kubernetes evaluates several factors while binding a PVC to a PV. If there are multiple PVs can satisfy a claim, we can use labels and selectors to bind the claim to a specific volume. Lets see how we can create PVC in the below example.
apiVersion: v1
kind: PersistentVolumeClaim
metadata:
  name: my-pvc-vol
spec:
  accessModes:
    - ReadWriteMany
  resources:
    requests:
      storage: 100Mi
yaml
Whenever a claim is created, Kubernetes looks at volume created previously and if requirements matched then we can see the claim got bound with volume.
➜  kubectl get pvc
NAME          STATUS   VOLUME   CAPACITY   ACCESS MODES   STORAGECLASS   VOLUMEATTRIBUTESCLASS   AGE
my-pvc-vol    Bound    my-pv-vol   200Mi      RWX                           <unset>              25s
bash
But what happens if you deleted the PVC, well you can choose yourself by setting its reclaim policy and by default it is set to retain as you can see in above example of persistent volume. Also if you set the reclaim policy to retain then PV will remain until it is manually deleted by the administrator but it is not available for reuse by any other claim. You can visit the official page of kubernetes for more details about reclaim policies such as delete and recycle.
Update Pod to Use the PVC:
When PVC is bound to the PV, update your pod definition file to use the PVC instead of a direct HostPath mount and Below is a sample.
volumes:
  - name: log-volume
    persistentVolumeClaim:
      claimName: my-pvc-vol
yaml
Storage classes
A StorageClass is a Kubernetes object that acts as a blueprint for dynamically provisioning storage resources. It's a way for a cluster administrator to describe the different types of storage a cluster can offer. With the help of storage classes we can define provisioners such as google cloud storage that can automatically provision storage on google cloud and attach that to pods when claim is made and this is called dynamic provisioning of volumes.
There are many provisioners such as AWS EBS, Azure File, Azure Disk, CephFS, Portworx and so on. Let’s check how to create a storage class object or definition file that defines a provisioner. In our case, we are going to use Google Cloud's persistent disk.
apiVersion: storage.k8s.io/v1
kind: StorageClass
metadata:
  name: google-storage
provisioner: kubernetes.io/gce-pd
yaml
After creating a storage class object definition file, modify your PVC to reference it for dynamic provisioning.
apiVersion: v1
kind: PersistentVolumeClaim
metadata:
  name: my-pvc-vol
spec:
  accessModes:
    - ReadWriteMany
  storageClassName: google-storage
  resources:
    requests:
      storage: 100Mi
yaml
So, now when PVC is created then the storage class associated with it uses a defined provisioner to provision a new disk with required size on GCP which then creates a PV and binds PVC to that volume.
Some Key components of a StorageClass:
- Provisioner: This specifies the volume plugin or driver used to provision the storage.
- Reclaim Policy: This defines what happens to the underlying storage volume when the PVC is deleted.
- Volume Binding Mode: This controls when volume binding and dynamic provisioning should occur.
For more information about storage classes you can visit official documentation of kubernetes to get in-depth knowledge on this.
Security Hardening
Securing your Kubernetes workloads is just as important as scaling them. Implementing security hardening practices helps minimize vulnerabilities, protect sensitive data, and ensure compliance in production environments. So lets just check below points that how we can secure our kubernetes deployment and its security through these parameters.
Image Security
Image Security is an essential aspect of running applications in Kubernetes. Also Container images are often the first attack surface in a Kubernetes deployment, so securing them is critical. So lets start with a simple pod definition file example below.
apiVersion: v1
kind: Pod
metadata:
  name: nginx-pod
spec:
  containers:
    - name: nginx
      image: nginx
yaml
If you specify nginx as the image, Docker interprets it as library/nginx from Docker Hub’s official repository. For custom builds, always use your own namespace (e.g. your-account/nginx). Unless another registry is mentioned, Docker defaults to pulling images from Docker Hub (docker.io).
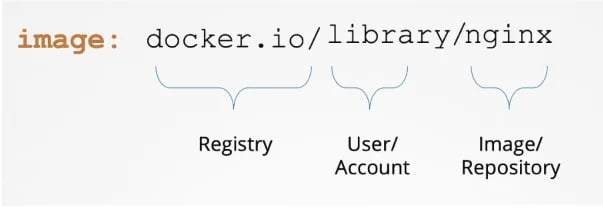
When you have applications built in-house that shouldn't be made available to the public then hosting an internal private registry is a good solution. There are many popular cloud service providers available such as AWS, Azure, and GCP who offer private registries built into their platforms. Alternatively, tools like Google Container Registry (gcr.io) are frequently used for Kubernetes-related images and testing purposes.
Private Registries & Authentication
Apart from any solution, be it Docker Hub or Google’s registry or your internal private registry, you may choose to make a repository private so that it can be accessed using a set of credentials. From docker’s perspective, to run an application container using a private image, you first need to login using docker login command and then run your application using the image from a private registry.
Using Private Registry Images in Pods
To use images from a private registry, reference the full path in your pod spec:
apiVersion: v1
kind: Pod
metadata:
  name: private-reg
spec:
  containers:
    - name: private-reg-container
      image: <your-private-image>
yaml
Create a Docker registry secret with your credentials:
kubectl create secret docker-registry <name> \

 --docker-server=<docker-registry-server> \

 --docker-username=<docker-user> \

 --docker-password=<docker-password> \

 --docker-email=<docker-email>
bash
Then, link the secret in the pod definition:
apiVersion: v1
kind: Pod
metadata:
  name: private-reg
spec:
  containers:
    - name: private-reg-container
      image: <your-private-image>
  imagePullSecrets:
    - name: <secret-name>
yaml
Pod Security Standards
Kubernetes introduced Pod Security Admission (PSA) through KEP 2579, replacing the older Pod Security Policies (PSP). The goal was to simplify pod security enforcement while keeping it safe and extensible. For teams needing more advanced policy checks, external admission controllers such as OPA Gatekeeper, Kyverno, Open Policy Agent(OPA) can be integrated.
What is Pod Security Admission?
PSA is an admission controller that is active in Kubernetes by default. It validates pod security requirements at the time of pod creation.
To confirm that PSA is enabled on your cluster, you can inspect the API server plugins:
kubectl exec -n kube-system kube-apiserver-controlplane -it -- \
  kube-apiserver -h | grep enable-admission-plugins
bash
You should see PodSecurity listed among the plugins.
Configure PSA at the namespace level by adding labels:
kubectl label namespace <NAMESPACE> pod-security.kubernetes.io/<mode>=<profile>
bash
Pod Security Standards Profiles
PSA provides three predefined profiles that represent different levels of restriction:
| Profile | Summary | Suitable For |
|---|---|---|
| Privileged | No restrictions, full capabilities | Debugging, system workloads |
| Baseline | Minimal restrictions, avoids privilege escalation | Typical Applications |
| Restricted | Most restrictive, aligns with security best practices | Sensitive or regulated workloads |
PSA Modes Explained
| Mode | Effect when a violation occurs |
|---|---|
| enforce | Blocks pod creation if it violates policy |
| audit | Allows the pod but records an audit log |
| warn | Allows the pod and displays a warning message |
These can be combined depending on your needs:
-
warn+restricted: Pods are admitted but warnings are shown if they break rules.
-
enforce+restricted: Pods that don’t comply are blocked entirely.
For more detailed information, you can visit official documentation.
Conclusion
Making a Kubernetes deployment production-ready goes beyond simply running workloads, it’s about ensuring security, reliability, scalability, and maintainability. By setting up proper RBAC, enforcing resource limits, applying security best practices, configuring storage, and managing networking effectively, you create a solid foundation for your applications. Adding health checks, autoscaling, and high availability ensures your workloads stay resilient under real-world conditions.
Ultimately, a production-ready cluster is one that is secure, observable, and prepared to scale, giving your team confidence that applications can handle both growth and unexpected failures smoothly. With these practices in place, Kubernetes truly becomes a powerful platform for running production workloads at scale.
Get a free Kubernetes audit to make your cluster production ready.
